
Cluster Stitch Bag
Would you like to buy me a cup of Tea to say thank you for the free pattern and video? Thank you xxx
Click below ⬇⬇
Buy me a coffee
Click below ⬇⬇
Buy me a coffee


Designed by Clare Sullivan
Easy
Us terminology
Video tutorial - http://www.youtube.com/watch?v=BO5kYGJ7tDg
Materials
Yarn (see note below)
Hook (see note below)
Scissors and yarn needle
4 stitch markers
Notes
- My bag used 2 strands of 8ply/DK/number 3 yarn yarn held together and a 6mm/J hook,
- The size of your bag will depend on the amount of yarn that you need. I used 200gm/7oz of yarn to make a small bag – I held 2 strands together
- You can use any yarn that you like.
- You can use 1 strand of medium worsted weight/aran/10 ply yarn and a 5.5mm/I hook
- 1 strand of 8ply/DK/number 3 yarn yarn will need a 4mm hook
- I did 4 rows for base of bag and 7 rows of cluster stitch
- Beginning cluster / beg cl - Ch3, the ch3 COUNTS as 1st stitch, Yarn over, insert the hook into the same stitch, yarn over, draw the yarn through the stitch, yarn over, draw the yarn through 2 loops on the hook, two loops remain on the hook, , Yarn over, insert the hook into the same stitch, yarn over, draw the yarn through the stitch, yarn over, draw the yarn through 2 loops on the hook, three loops remain on the hook, yarn over and pull through all loops on hook.
- Cluster / cl - Yarn over, insert the hook into the next stitch, yarn over, draw the yarn through the stitch, yarn over, draw the yarn through 2 loops on the hook, two loops remain on the hook, , Yarn over, insert the hook into the same stitch, yarn over, draw the yarn through the stitch, yarn over, draw the yarn through 2 loops on the hook, three loops remain on the hook, , Yarn over, insert the hook into the same stitch, yarn over, draw the yarn through the stitch, yarn over, draw the yarn through 2 loops on the hook, four loops remain on the hook, yarn over and pull though all loops
Base of bag
Using 2 strands of 8ply/DK/number 3 yarn or 1 strand of medium worsted weight yarn
Ch4, join with a slip stitch into the 1st ch to make a ring or make a magic ring
1 - Ch3 (ch3 does not count as a stitch for the base of bag) 12dc into ring, join with a slip stitch into the 1st dc
2 - Ch3, 2 dc into the same stitch, 2 dc’s in each stitch around, join with a slip stitch into the 1st dc
3 - Ch3, 1 dc into the same stitch, 2 dc into the next stitch, *1 dc into the next stitch, 2 dc into the next stitch* repeat from * to * around, join with a slip stitch into the 1st dc
Note: you can stop increasing the base of your bag base when you have the width you want
4 - Ch3, 1 dc into the same stitch, 1 dc into the next stitch, 2 dc into the next stitch, *1 dc into the next 2 stitches, 2 dcr into the next stitch* repeat from * to * around , join with a slip stitch into the 1st dc
5 - Ch3, 1 dc into the same stitch, 1 dc into the next 2 stitches, 2 dc into the next stitch, *1 dc into the next 3 stitches, 2 dc into the next stitch* repeat from * to * around , join with a slip stitch into the 1st dc
(Stop here for a small bag and ignore the next 2 rounds, go straight to the cluster stitch round)
6 - Ch3, 1 dc into the same stitch, 1 dc into the next 3 stitches , 2 dc into the next stitch, *1 dc into the next 4 stitches, 2 dc into the next stitch* repeat from * to * around , join with a slip stitch into the 1st dc
If you need another increase round follow next row if not ignore the next row
7 - Ch3, 1 dc into the same stitch, 1 dc into the next 4 stitches , 2 dc into the next stitch, *1 dc into the next 5 stitches, 2 dc into the next stitch* repeat from * to * around , join with a slip stitch into the 1st dc
Cluster stitch rounds
A cluster stitch is worked leaving the last 2 loops of the double crochet on the hook
(The following is a lot of words for not a lot of work) you already know how to make a double crochet so you find it really easy!
1 - Beg cl *Skip a stitch, ch1, cl into the next stitch* repeat from * to * slip stitch to join into the top of the 1st cluster stitch
If using same colour for next row - Slip stitch across to chain space
If using different color, finish off old colour and attach new colour in any ch space
2 - Beg cl, *ch1, cl into the next ch1 space* repeat from * to * slip stitch to join into the top of the 1st cluster
3 - Repeat row 2 for as many rows as you need – I did 7 rows for a small bag
Edging
1 - Ch1, hdc into the same stitch, hdc into the ch1 space*hdc into the top of the cl stitch, hdc into the ch1 space* repeat from * to * join with a slip stitch to 1st hdc
Repeat last round twice more
1 - Ch1, hdc into the same stitch, hdc into the ch1 space*hdc into the top of the cl stitch, hdc into the ch1 space* repeat from * to * join with a slip stitch to 1st hdc
Repeat last round twice more
Handles
Lay bag flat so your yarn is attached with the yarn on the right hand fold
Using your 4 stitch markers, mark the ¼ and ¾ points on the front and back
Lay bag flat so your yarn is attached with the yarn on the right hand fold
Using your 4 stitch markers, mark the ¼ and ¾ points on the front and back
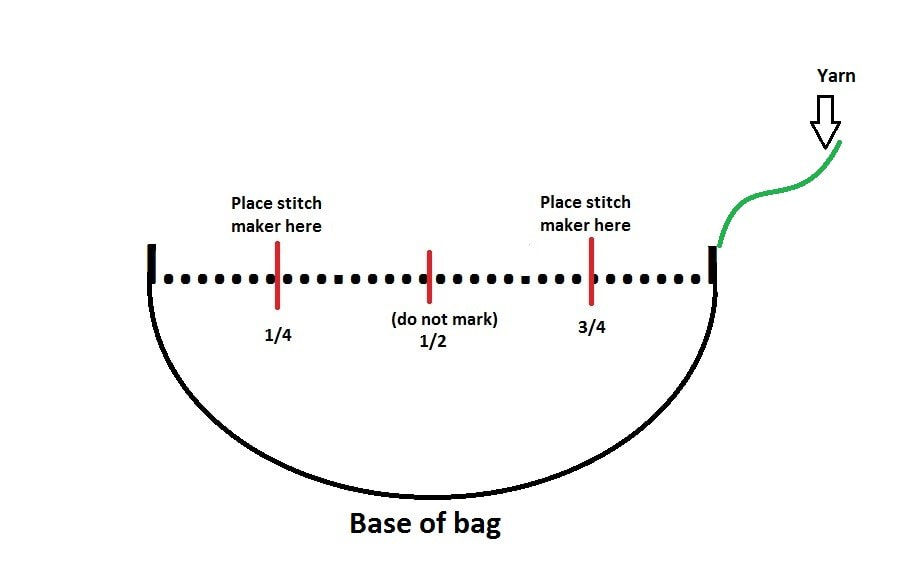
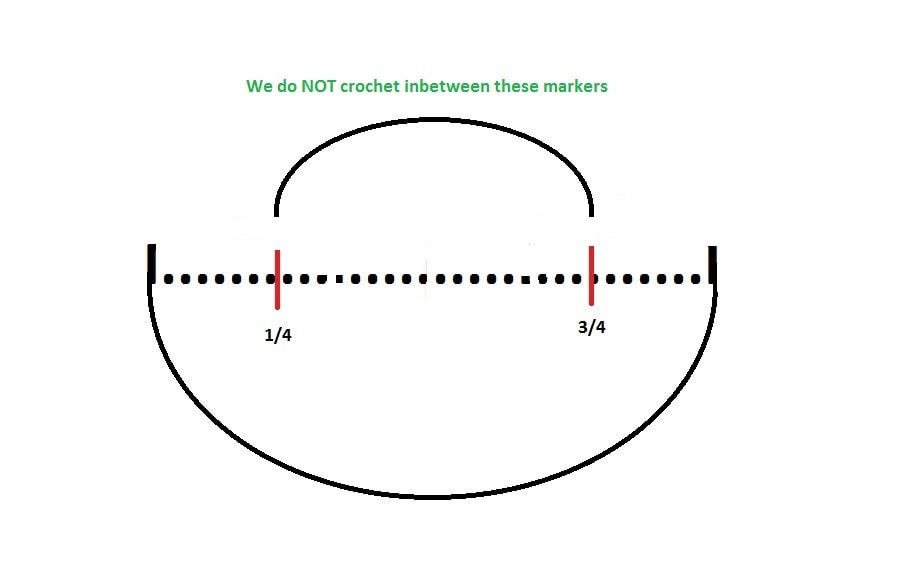
- Ch1, hdc into the same stitch, hdc into each stitch until the next stitch marker, make a chain the length you want your handles (the amount of chains needed will have to be at least the same amount of stitches that are skipped, see image below)
Write down the amount of chains that you made so that you can make the same amount of chains for the next handle
Thank you for choosing my pattern
Happy crochet
Clare xx
- Hdc into the next marked stitch, hdc into each stitch until the next marked stitch, make the same amount of chains that you did for the first handle, hdc into the next stitch marker and each remaining stitch. Slip stitch to the 1st hdc to join
- Ch1, hdc into each hdc and ch stitch, join to the 1st hdc
- If you want to make the handles wider
Thank you for choosing my pattern
Happy crochet
Clare xx
| cluster_bag_uk_version_crafternoontreats.com.pdf |
Add this project to your Ravelry project page