
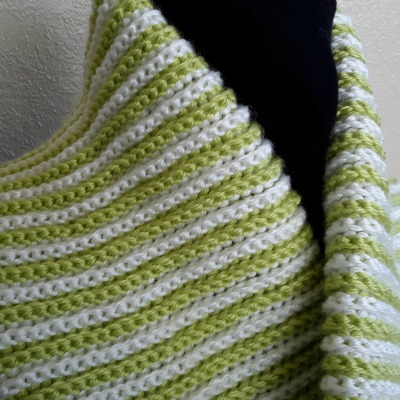
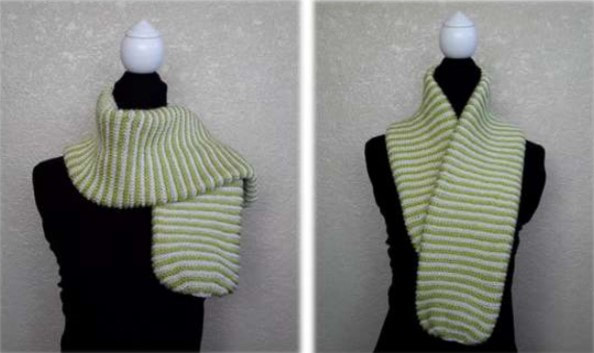
Double Ribbed Spiral Scarf
Easy to adjust width and length
Would you like to buy me a cup of Tea to say thank you for the free pattern and video? Thank you xxx
Click below ⬇⬇
Buy me a coffee
Click below ⬇⬇
Buy me a coffee
|
|
Add to your Ravelry projects or queue


|
Double ribbed spiral scarf
Designed by Clare Sullivan Video tutorial – http://youtu.be/kpUSFvUfnrg US terminology Intermediate |

|
Materials
8ply / DK yarn and a 4.5 mm / US 7 hook
Worsted weight yarn and a 5.5 mm / I hook
Scissors
Yarn needle
2 stitch markers
8ply / DK yarn and a 4.5 mm / US 7 hook
Worsted weight yarn and a 5.5 mm / I hook
Scissors
Yarn needle
2 stitch markers
|
Sc – single crochet
Hdc – half double crochet Fpdc – front post double crochet Fpdc2tog – front post double crochet 2 together Fpsc – front post single crochet Fphdc - front post half double crochet *This written pattern contains screen shots from the video tutorial * |
|
Decide which will be “color A” and which will be “color B”. They both will play equal prominence in the pattern. Where the instructions say “remove hook” – either attach a stitch marker into the loop or enlarge the loop enough so the stitch doesn’t undo itself when working on the other color.
Using color A: chain 4 then slipstitch into the first chain making a circle.
Using color A: chain 4 then slipstitch into the first chain making a circle.
Round 1 – Still with color A - sc into the ring, hdc into the ring, 4dc into the ring. Remove hook. Using color B – sc into the ring next to where you finished with color A, hdc into the ring, 4dc into the ring. Remove hook. Total of 12 stitches.
Round 2 – Place hook into loop of color A, 2fpdc into each stitch of color B of the previous round. Remove hook. Place the hook into loop of color B, 2fpdc into each stitch of color A of the previous round. Remove hook. Total of 24 stitches.
Round 3 – Place hook into loop of color A, *fpdc, 2fpdc into the next stitch, repeat from the asterisk 6 times. Remove hook. Place hook into loop of color B, *fpdc, 2fpdc into the next stitch, repeat from the asterisk 6 times. Remove hook. Total of 36 stitches.
If at any stage you have the scarf the width you need, skip to non-increase section
Round 4 – Place hook into loop of color A, *fpdc into the first 2 stitches, 2fpdc into the next stitch, repeat from the asterisk 6 times. Remove hook. Place hook into loop of color B, *fpdc into the first 2 stitches, 2fpdc into the next stitch, repeat instructions from the asterisk 6 times. Remove hook. Total of 48 stitches.
Round 5 – Place hook into loop of color A, *fpdc into the first 3 stitches, 2fpdc into the next stitch, repeat from the asterisk 6 times. Remove hook. Place hook into loop of color B, *fpdc into the first 3 stitches, 2fpdc into the next stitch, repeat instructions from the asterisk 6 times. Remove hook. Total of 60 stitches.
Non-increase section
Round 8 – Place hook into loop of color A, fpdc in every stitch for half the round (42 stitches). Remove hook. Place hook into loop of color B, fpdc in every stitch for the remainder of the round. Total of 84 stitches
Repeat round 8. Until you have the scarf the length you desire
Round 8 – Place hook into loop of color A, fpdc in every stitch for half the round (42 stitches). Remove hook. Place hook into loop of color B, fpdc in every stitch for the remainder of the round. Total of 84 stitches
Repeat round 8. Until you have the scarf the length you desire
Decrease section – if you did a different amount of increases rounds – for example - fpdc, 2fpdc into the next stitch – you will need to start here for your decreasing – instead of working the increase stitch you will work a DECREASE
- Place hook into loop of color A, *fpdc into the first 3 stitches, fpdc2tog around the next 2 stitch, repeat from the asterisk 6 times. Remove hook. Place hook into loop of color B, *fpdc into the first 3 stitches, fpdc2tog into the next stitch, repeat instructions from the asterisk 6 times. Remove hook.
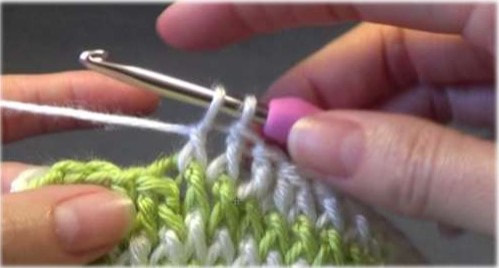
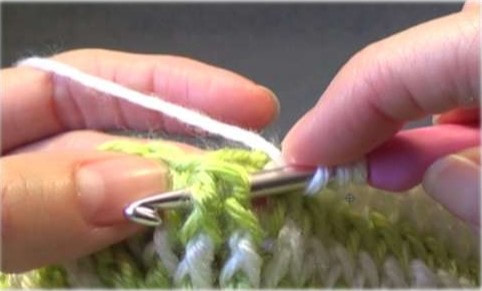
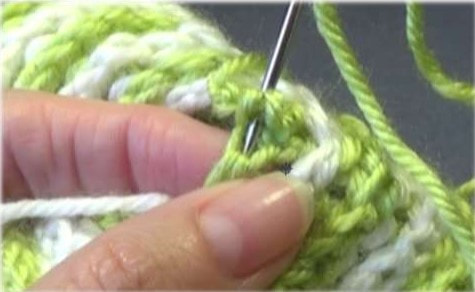
The decreases from the previous round will count as 1 stitch – the first part of the decrease is worked around the first fpdc (see pic 1) and the second part of the decease is worked around the decrease from the previous round – this will look like 2 stitches but it is actually 1 (see pic 2)
Pic 1
Pic 2
- Place hook into loop of color A, *fpdc into the first 2 stitches, fpdc2tog, repeat from the asterisk 6 times. Remove hook. Place hook into loop of color B, **fpdc into the first 2 stitches, fpdc2tog, repeat instructions from the asterisk 6 times.
- Place hook into loop of color A, *fpdc, fpdc2tog, repeat from the asterisk 6 times. Remove hook. Place hook into loop of color B, *fpdc, fpdc2tog, repeat from the asterisk 6 times. Remove hook.
- Place hook into loop of color A, fpdc2tog around color B of the previous round. Remove hook. Place the hook into loop of color B, fpdc2tog around color A of the previous round. Remove hook.
- Place hook into loop of color A. Fpdc into the next 4 stitches, fphdc into the next, fpsc into the next Remove hook. Place the hook into loop of color B. Fpdc into the next 4 stitches, fphdc into the next, fpsc. Remove hook
- Finish off leaving a 6 inch tail. Weave colour A into color A through the top of the stitches and color B into colour B through the top of the stitches to close up hole (see image below)
- Sew in ends
Thank you for choosing my pattern
Happy crochet
Clare xx
Happy crochet
Clare xx
|
|
 |