Crochet Jessica Shawl
Would you like to buy me a cup of Tea to say thank you for the free pattern and video? Thank you xxx
Click below ⬇⬇
Buy me a coffee
Click below ⬇⬇
Buy me a coffee
Add to your Ravelry queue and project page
Designed by Clare Sullivan
US terminology
Easy+ - Intermediate
Video tutorial playlist https://www.youtube.com/playlist?list=PLBAl2EuIYeKsGDWpW7TJ0gWDC2QPIs9TT
This makes a huge shawl! Crochet less rows if you want a smaller shawl, the edging will work with any amount of rows
198cm x 78 cm / 78 inches x 31 inches
US terminology
Easy+ - Intermediate
Video tutorial playlist https://www.youtube.com/playlist?list=PLBAl2EuIYeKsGDWpW7TJ0gWDC2QPIs9TT
This makes a huge shawl! Crochet less rows if you want a smaller shawl, the edging will work with any amount of rows
198cm x 78 cm / 78 inches x 31 inches
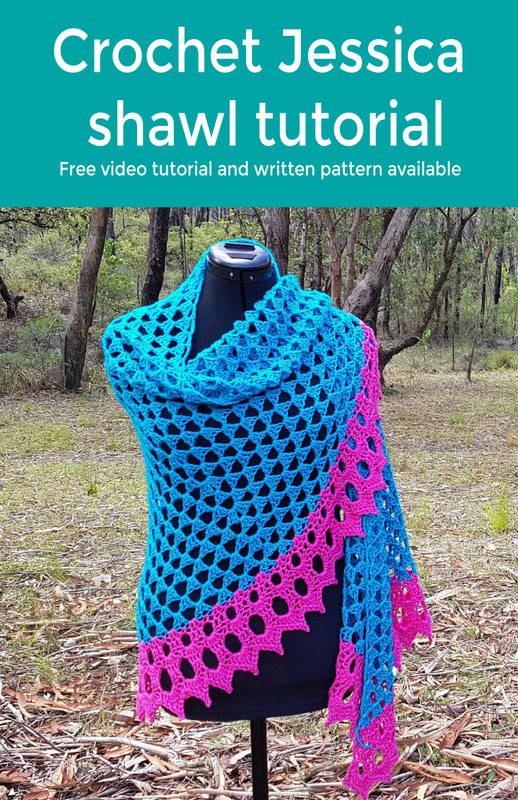
I named this the Jessica shawl because the whole time I was making the original shawl I kept it in a project bag given to me by my close friend Jessica <3
This pattern contains affiliate links, by making a purchase via the links (the blue underlined words) I will get a small commission at no extra cost to you, this helps keep my video tutorials and patterns free J
This pattern contains affiliate links, by making a purchase via the links (the blue underlined words) I will get a small commission at no extra cost to you, this helps keep my video tutorials and patterns free J
- Use a crochet hook 2 sizes bigger than recommended by your yarn
- Red Heart Chic Sheep 100 gram / 3.5 oz and 186 yards / 170 m
- I used approximately 390 grams/780 meters/853 yards of Fyberspates DK Deep forest for the test pattern and a 5mm/H hook)
- 3 locking (if possible) stitch markers, scissors, yarn needle
- Optional - Beads - big enough to thread onto your yarn, you will need as many beads as you have points on your last row. I used 72 for my 33 row (before edging) Red Heart version
- Blocking mats, T pins, blocking wires
- This project benefits greatly by blocking
- Each row (not including edging)
Click to set custom HTML
Will start with Ch 4, (3 dc, ch 1) into 1st space (right next to the ch 4)
Will end with (3 dc, ch 1, 1 dc) in the last space
You increase is (3 dc, ch 1, 3 dc, ch 1)
You will turn at the end of each row
- Ch 14, 3 dc into the 5th ch, ch 1,* skip 2, (3dc, ch1) repeat across ending with (3dc, ch1, 1dc) into last ch
- Ch 4 (3 dc, ch 1) in 1st ch 1 space (right next to the ch 4) (3 dc, ch 1) in next ch 1 space. (3 dc, ch 1, 3 dc, ch 1) in next space. Place a stitch maker in the ch 1 space between the 2 groups of 3 dc you just made- that was your MIDDLE increase (3 dc, ch 1) in the next ch 1 space (3 dc, ch 1, 1 dc) in the last space that was created by the skipped chains at the beginning of row 1
3 - Ch 4, (3 dc, ch 1) in 1st ch 1 space (right next to the ch 4) (3 dc, ch 1) in each ch 1 space across ignoring stitch marker (3 dc, ch 1, 1 dc) in last ch 1 space.
4 - Ch 4, (3 dc, ch 1) in 1st ch 1 space (right next to the ch 4) (3 dc, ch 1, 3 dc, ch 1) in next ch 1 space. Place a stitch maker in the ch 1 space between the 2 groups of 3 dc you just made- that was your OUTER increase. Outer will make total sense on row 7, promise J (3 dc, ch 1) in the next 4 ch 1 spaces (3 dc, ch 1, 3 dc, ch 1) in next ch 1 space. Place a stitch maker in the ch 1 space between the 2 groups of 3 dc you just made- that was your other OUTER increase. (3 dc, ch 1, 1 dc) in last ch 1 space
4 - Ch 4, (3 dc, ch 1) in 1st ch 1 space (right next to the ch 4) (3 dc, ch 1, 3 dc, ch 1) in next ch 1 space. Place a stitch maker in the ch 1 space between the 2 groups of 3 dc you just made- that was your OUTER increase. Outer will make total sense on row 7, promise J (3 dc, ch 1) in the next 4 ch 1 spaces (3 dc, ch 1, 3 dc, ch 1) in next ch 1 space. Place a stitch maker in the ch 1 space between the 2 groups of 3 dc you just made- that was your other OUTER increase. (3 dc, ch 1, 1 dc) in last ch 1 space
5 - Ch 4, (3 dc, ch 1) in 1st ch 1 space (right next to the ch 4) this is the last time I will remind you where the 1st ch 1 space is J (3 dc, ch 1) in next 4 ch 1 spaces.
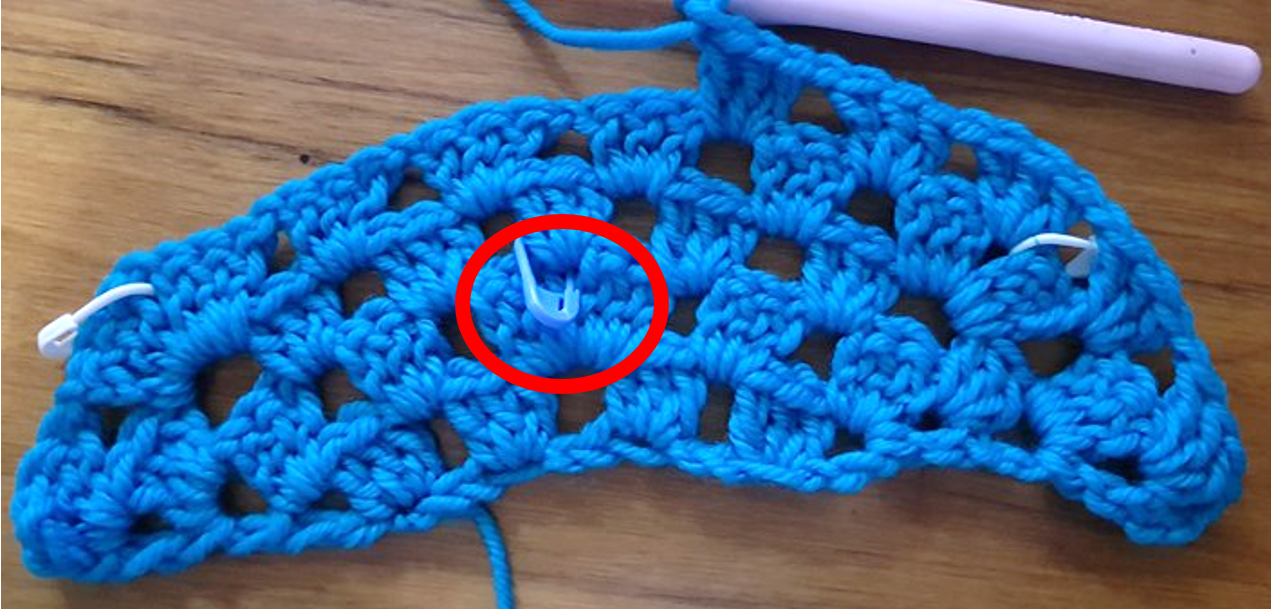
- Your middle stitch marker (marked with red circle in image below) marks the middle increase
- The white stitch markers mark the outer increases
- Depending on what row we are working, the ch 1 space where we need to work our next increase will line up with the stitch maker 3 rows later (see white arrow) this is the same with any increase
- The next lot of instruction will get you to work an increase into the next ch 1 space (see the space that I will crochet into next) see how the ch 1 space is lining up with stitch maker?
8 - Ch 4, (3 dc, ch 1) in each space until middle stitch marker, ignore outer stitch markers (3 dc, ch 1, 3 dc, ch 1) in ch 1 space - move stitch marker to the ch 1 space of the increase you just made. (3 dc, ch1) in each ch 1 space (3 dc, ch1, 1 dc) in last spaceThis makes a huge shawl! Crochet less rows if you want a smaller shawl, the edging will work with any amount of rows
The shawl is 198 cm x 78 cm / 78 inches x 31 inches
I did 35 rows on my DK (green) version and 33 rows on my worsted (blue and pink) weight version
Repeat row 6, 7 and 8 until you have the shawl almost the length you want - don’t forget the shawl will grow almost a third after you block it. The shawl edging will work with any amount of rows on the main section of your shawl J
6 - no increases except at beginning and end of row
7 - outer increases
8 - increase in the middle of row
Border
- Ch 3, 2dc in same stitch, *sc into 2nd dc of group of 3, 3dc into ch 1 space* repeat from * to * across, 3 dc into last space
- Ch 3, dc into the next 2 dc *ch 2, skip next stitch, 1 dc into the next 3 stitches* repeat from * to *across, 1 dc into last 3 stitches
- Ch 3, sc into next stitch *5 dc into ch 2 space, skip stitch, sc into the next * repeat from * to * across, dc into the last stitch
4 - Ch 3, 2 dc into the same stitch, ch 3, skip 2 *1 dc into the next 3 stiches, skip 3, ch 3* repeat from * to * across, 3 dc into last space
5 - Ch 3 *sc into the next stitch, 7 dc into ch space, skip 1 stitch* repeat from * to * across, dc into last stitch
5 - Ch 3 *sc into the next stitch, 7 dc into ch space, skip 1 stitch* repeat from * to * across, dc into last stitch
- If you want to add beads you will need to break yarn, thread as many beads onto the yarn as you have ch spaces, add at least 8 more just to be sure
- If you do not want beads there is no need to break the yarn
6 - Ch 1, sc into same stitch, sc into the next 4 stitches*(sc, ch 3, sc) into the next stitch (this should be the 4th stitch of the 7 dc of the previous row) sc into the next 7 stitches* repeat from * to * across. Sc in remaining stitches, finish off and sew in ends
If you have added the beads
Follow the instructions for no beads, but when you do the ch 3, do the following instead
Ch 1, pull up a bead, ch 1
Thank you for choosing my pattern
Happy crochet
Clare xx


